Mobile Check Deposit Guide
How to Deposit a Check Using Your Phone
What Is Mobile Check Deposit?
Mobile Check Deposit lets you deposit a check into your Bank of Marin account by simply taking a photo of it with your phone. There’s no need to visit a branch or ATM — you can deposit checks from the comfort of your home, anytime.
This guide walks you through the entire process step by step, from enrolling in the service to submitting your deposit.
Step 1: Enroll in Mobile Deposit
Before you can deposit checks with your phone, you’ll need to enroll in the Mobile Deposit service one time. You can do this from your computer or your phone.
- Log in to your Bank of Marin online banking
Sign in with your username and password, just like you normally would. - Go to “Enroll in Mobile Deposit”
In the left-hand menu, clickTransactions > Enroll in Mobile Deposit. - Accept the Terms and Conditions
You’ll see the Mobile Deposit Enrollment page. Check the box next to “I accept the Terms and Conditions”, then click the Accept button.
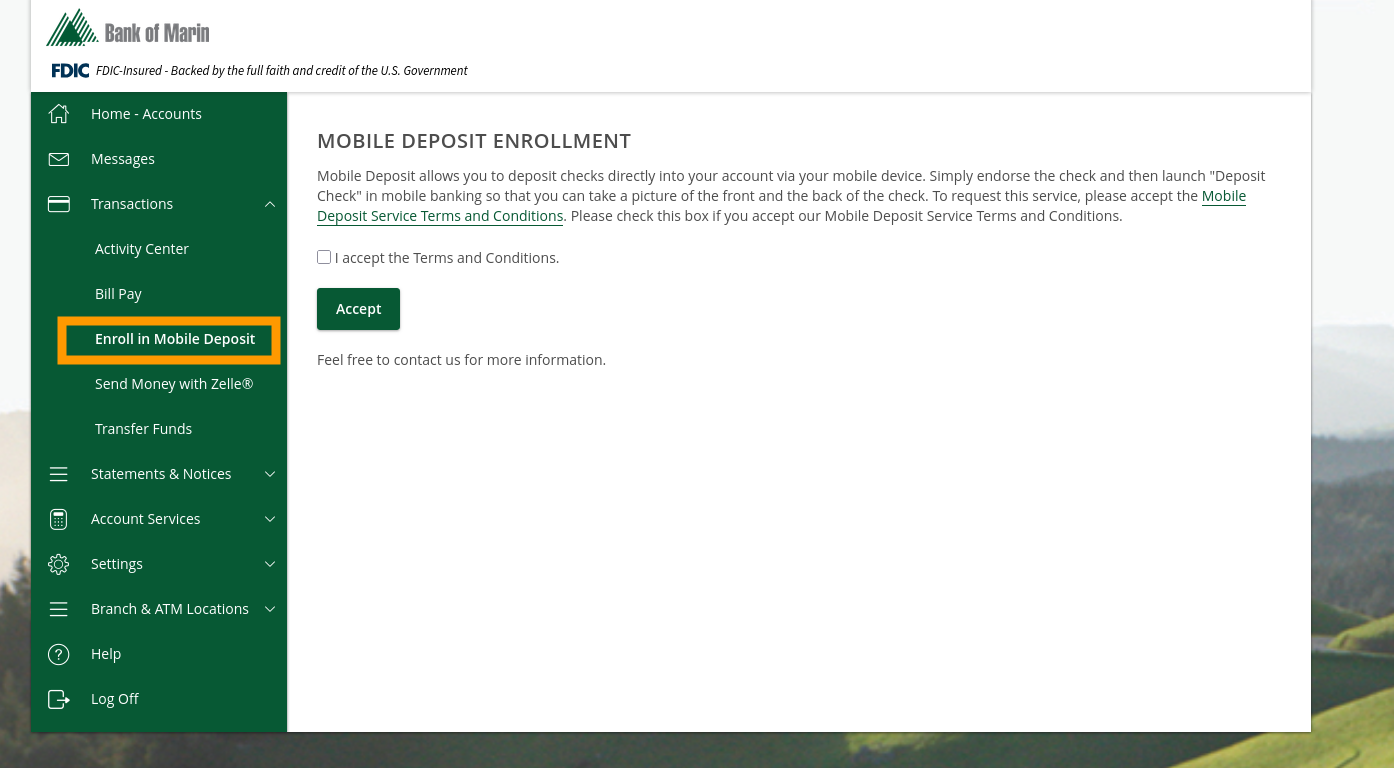
You only need to do this once. After you’ve enrolled, you’re all set to start depositing checks from your phone.
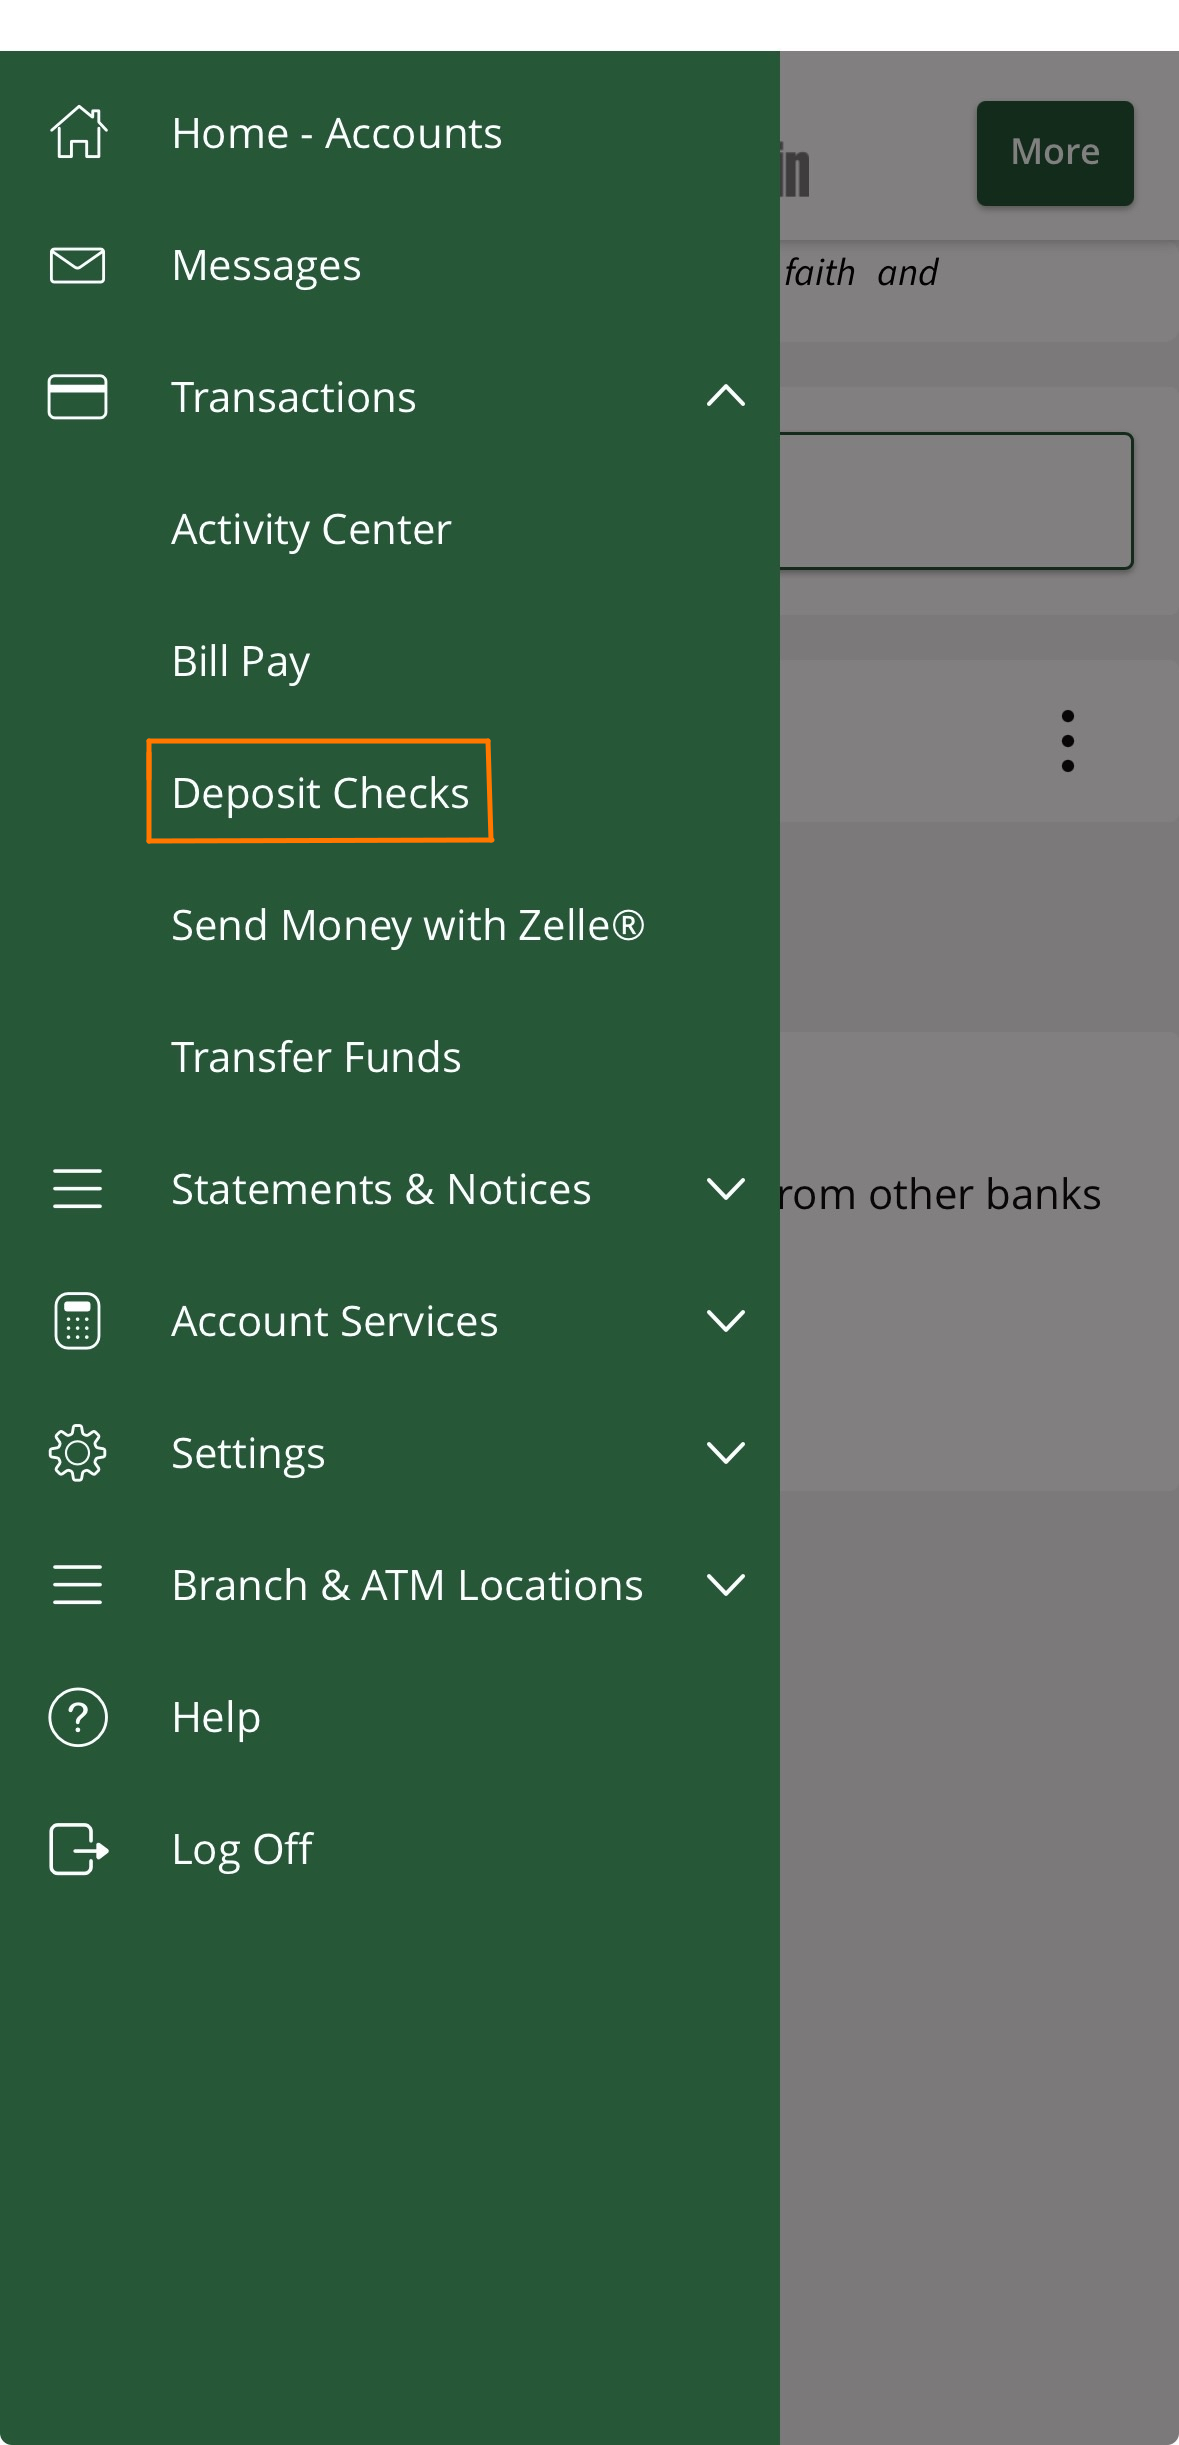
Step 2: Open the Deposit Tool on Your Phone
Now that you’re enrolled, open the Bank of Marin mobile app on your phone and follow these steps:
- Log in to the mobile app
Open the Bank of Marin app and sign in. - Tap the menu
Tap the menu icon (sometimes shown as three lines) to open the side navigation. - Tap “Transactions,” then “Deposit Checks”
Expand the Transactions section, then tap Deposit Checks.
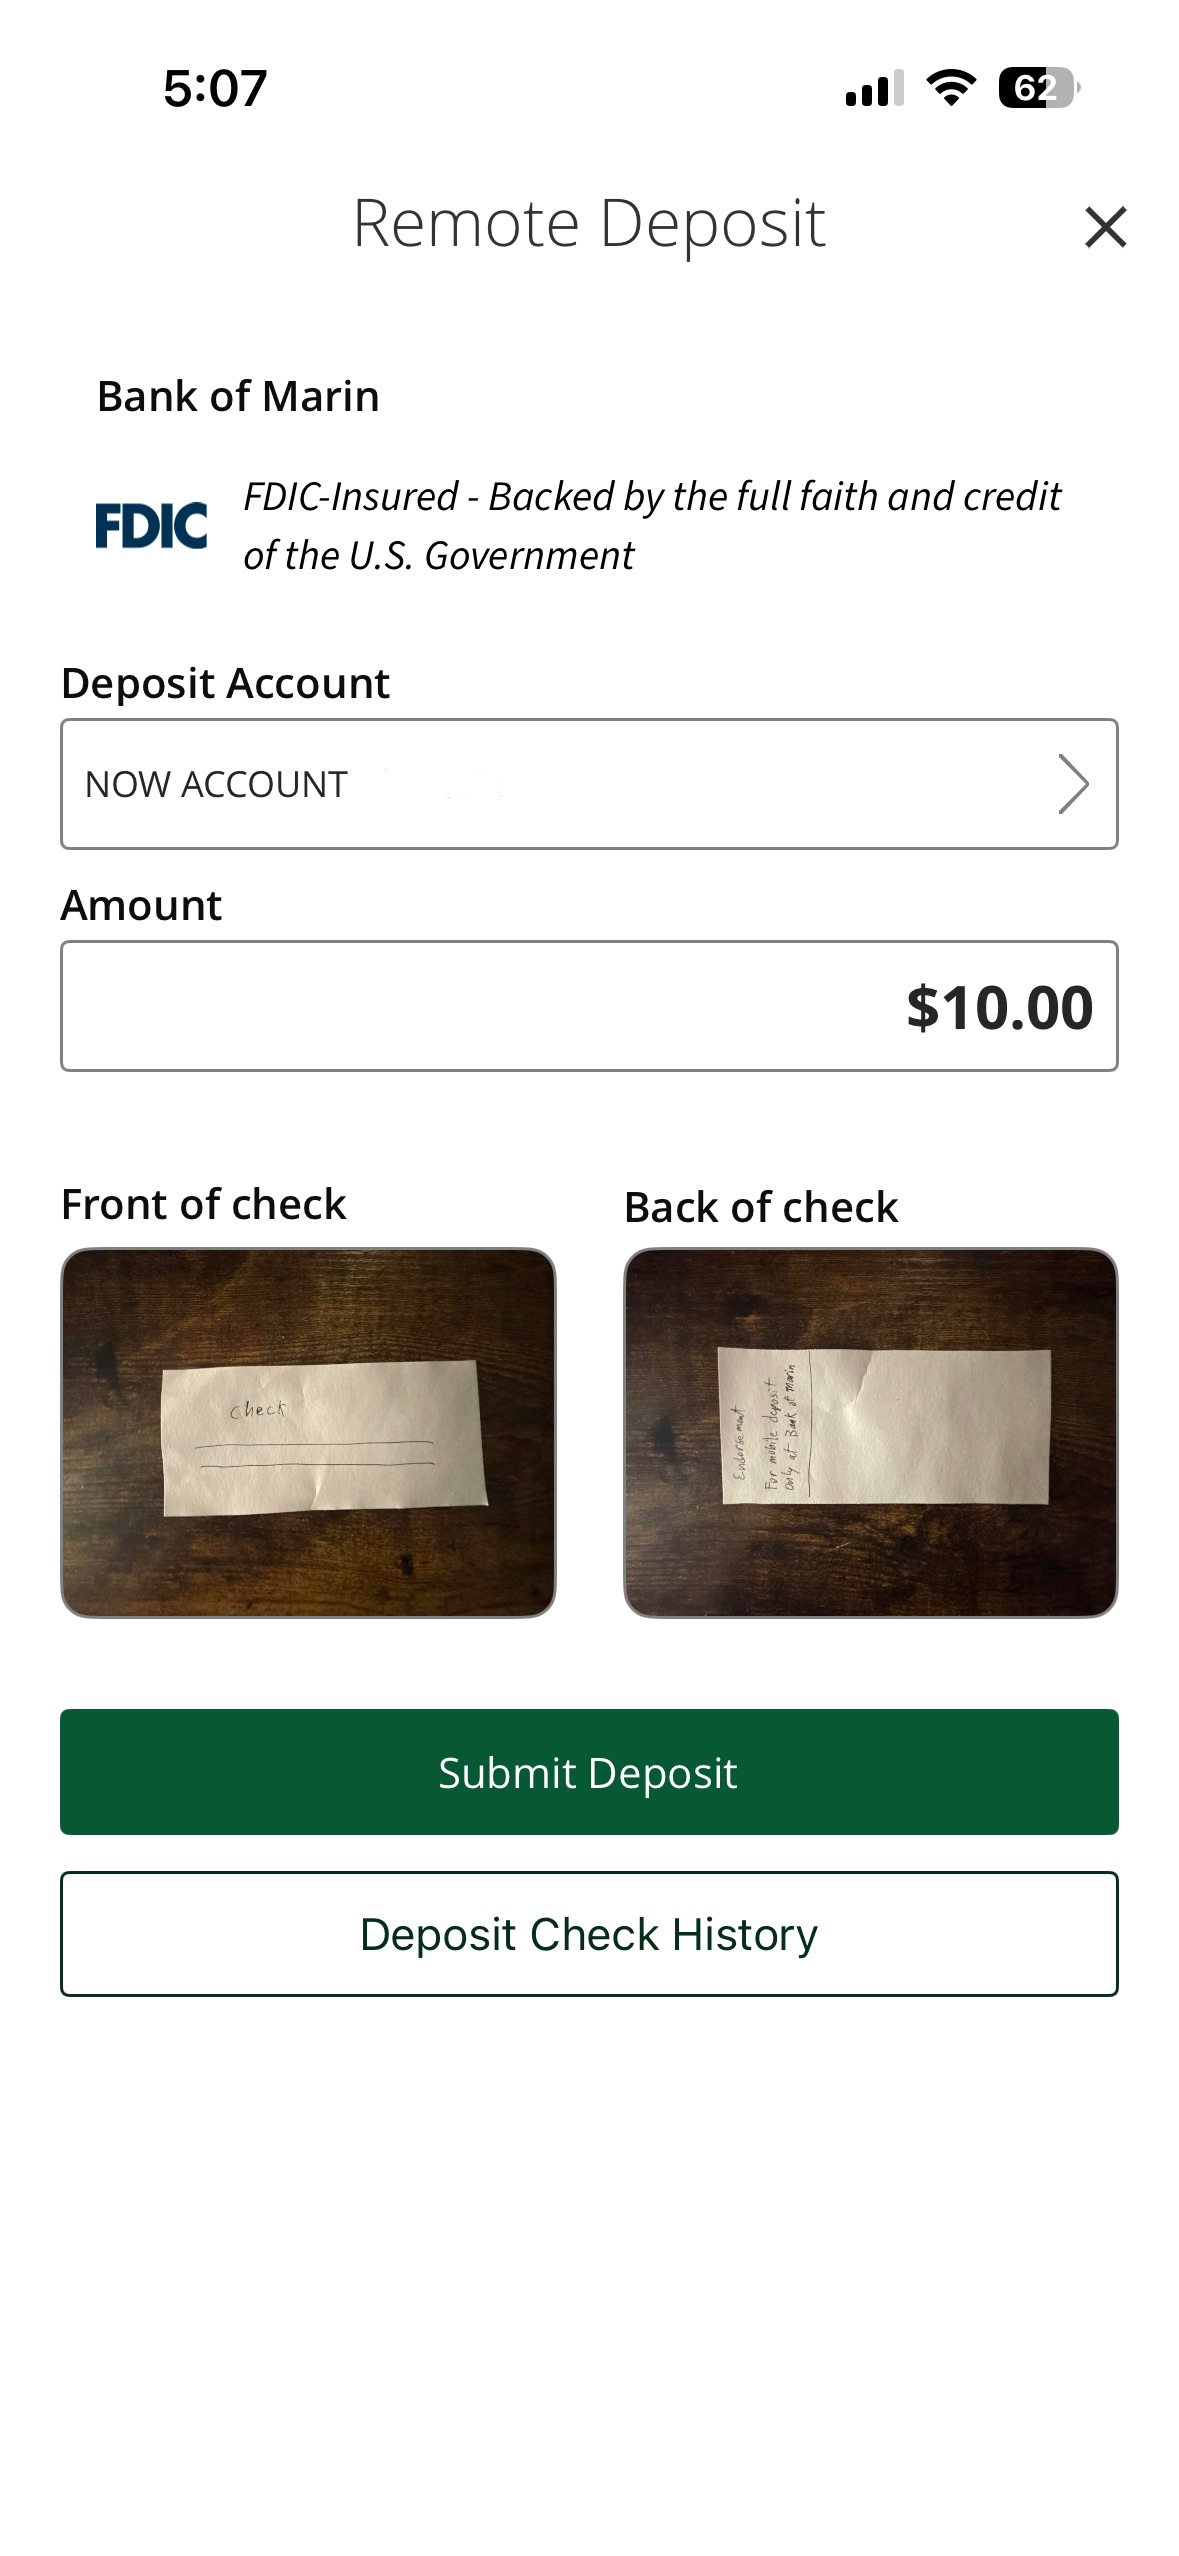
Step 3: Enter Your Deposit Details
Once the Remote Deposit screen opens, you’ll need to tell us where the money should go and how much the check is for:
- Select your Deposit Account
Tap the Deposit Account field and choose the account you’d like the check deposited into (for example, your checking or savings account). - Enter the Amount
Tap the Amount field and type in the exact dollar amount shown on your check. Double-check this number — it must match the check exactly.
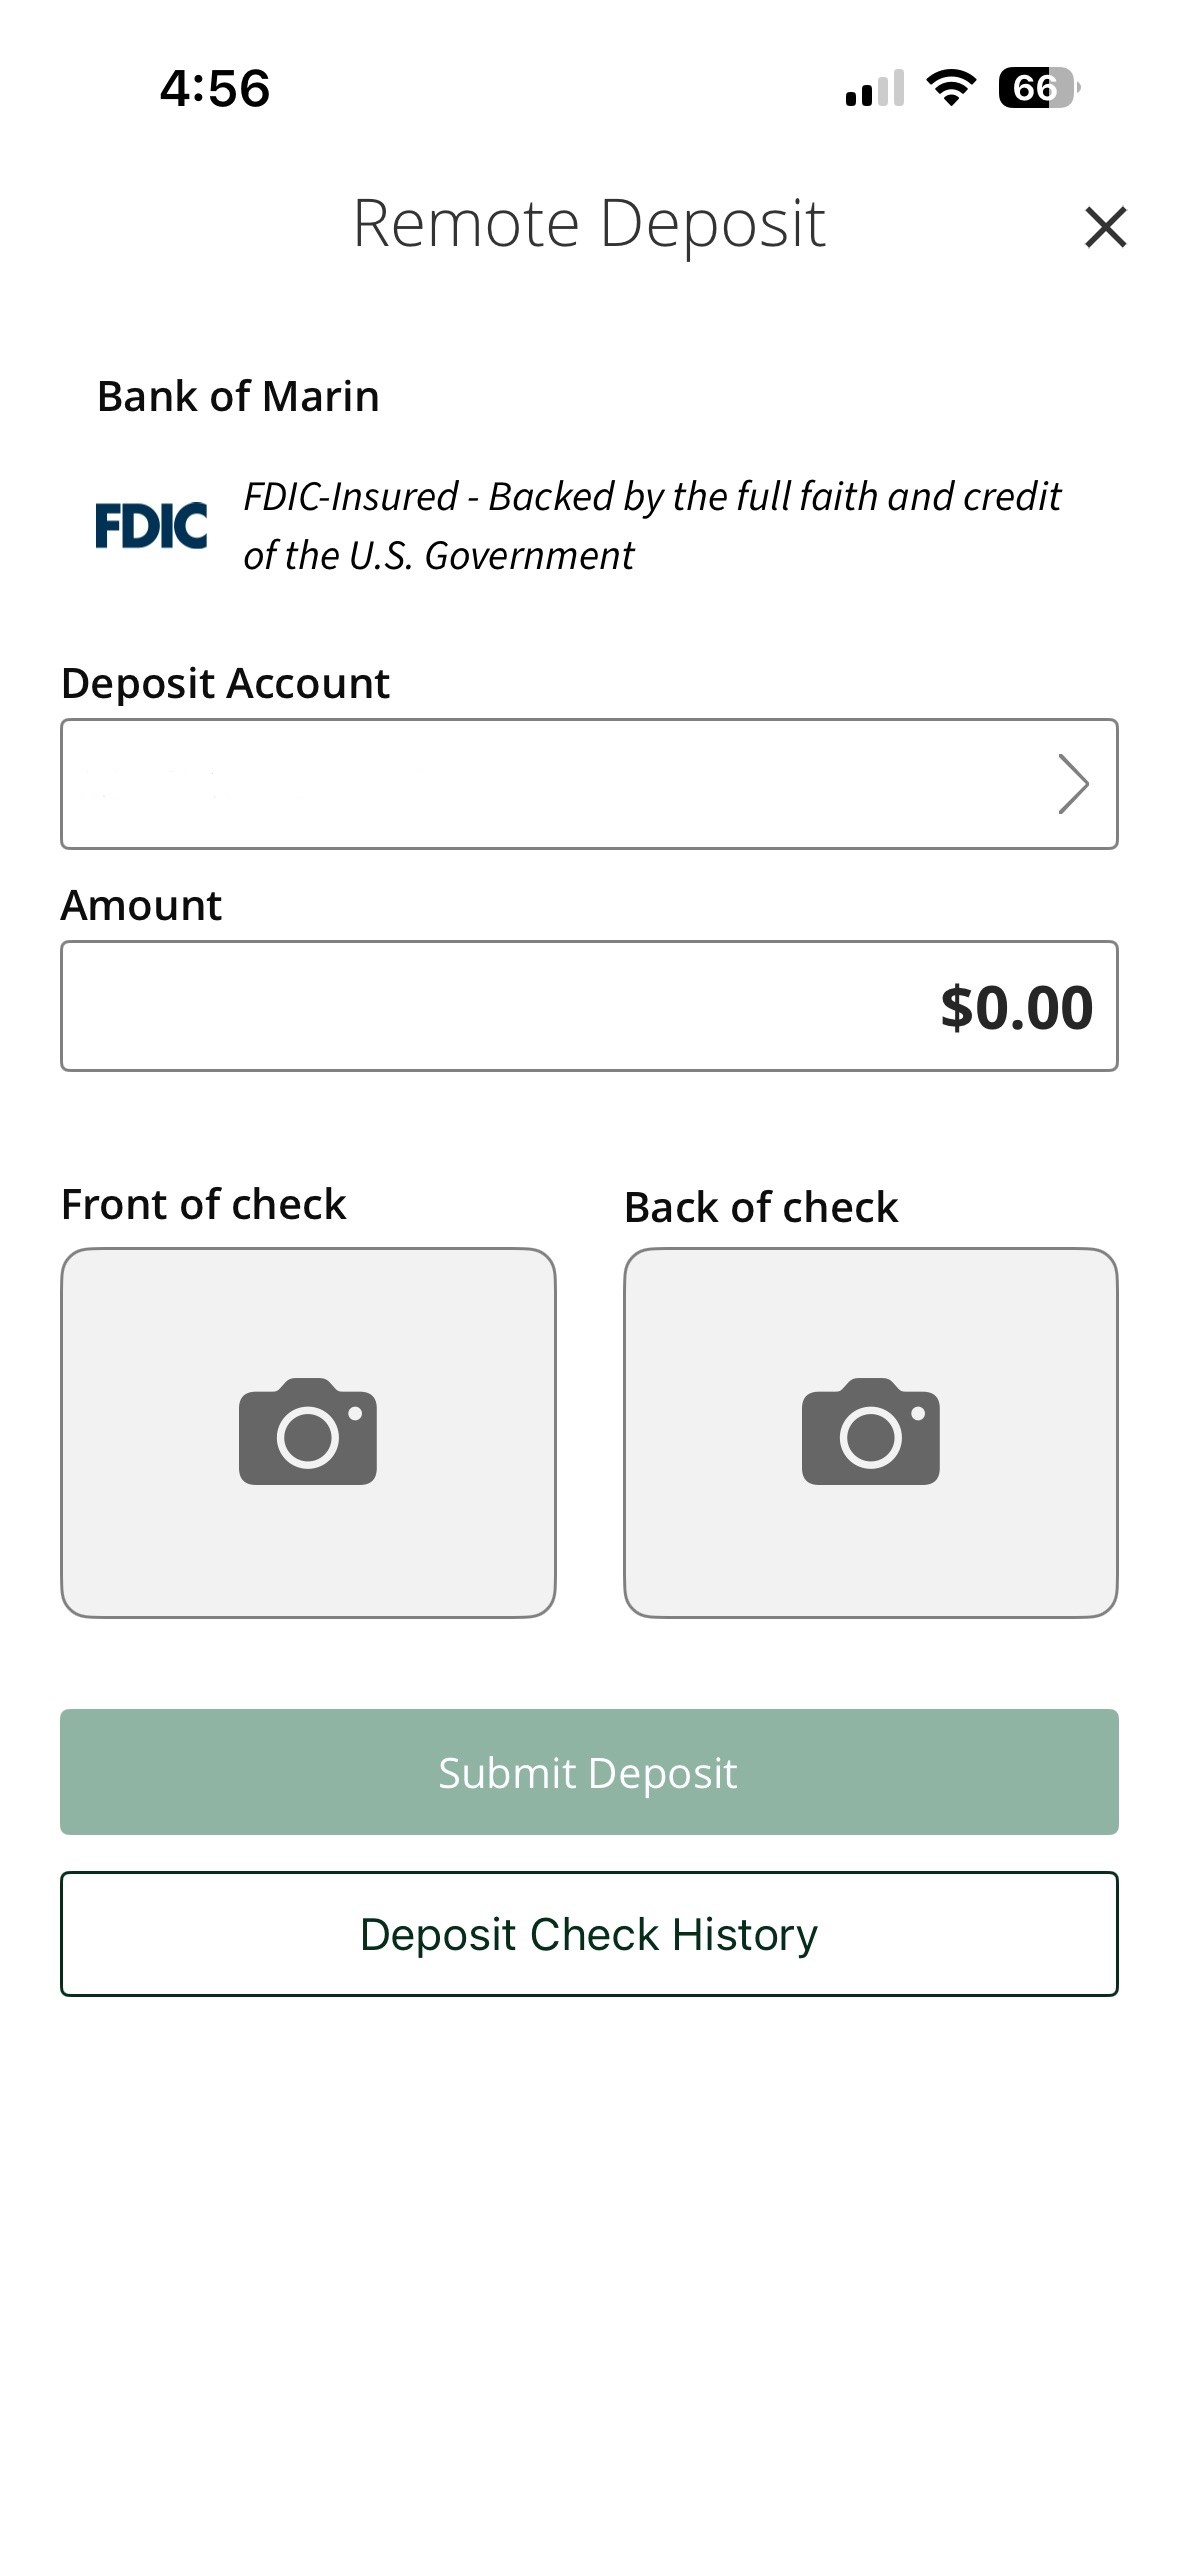
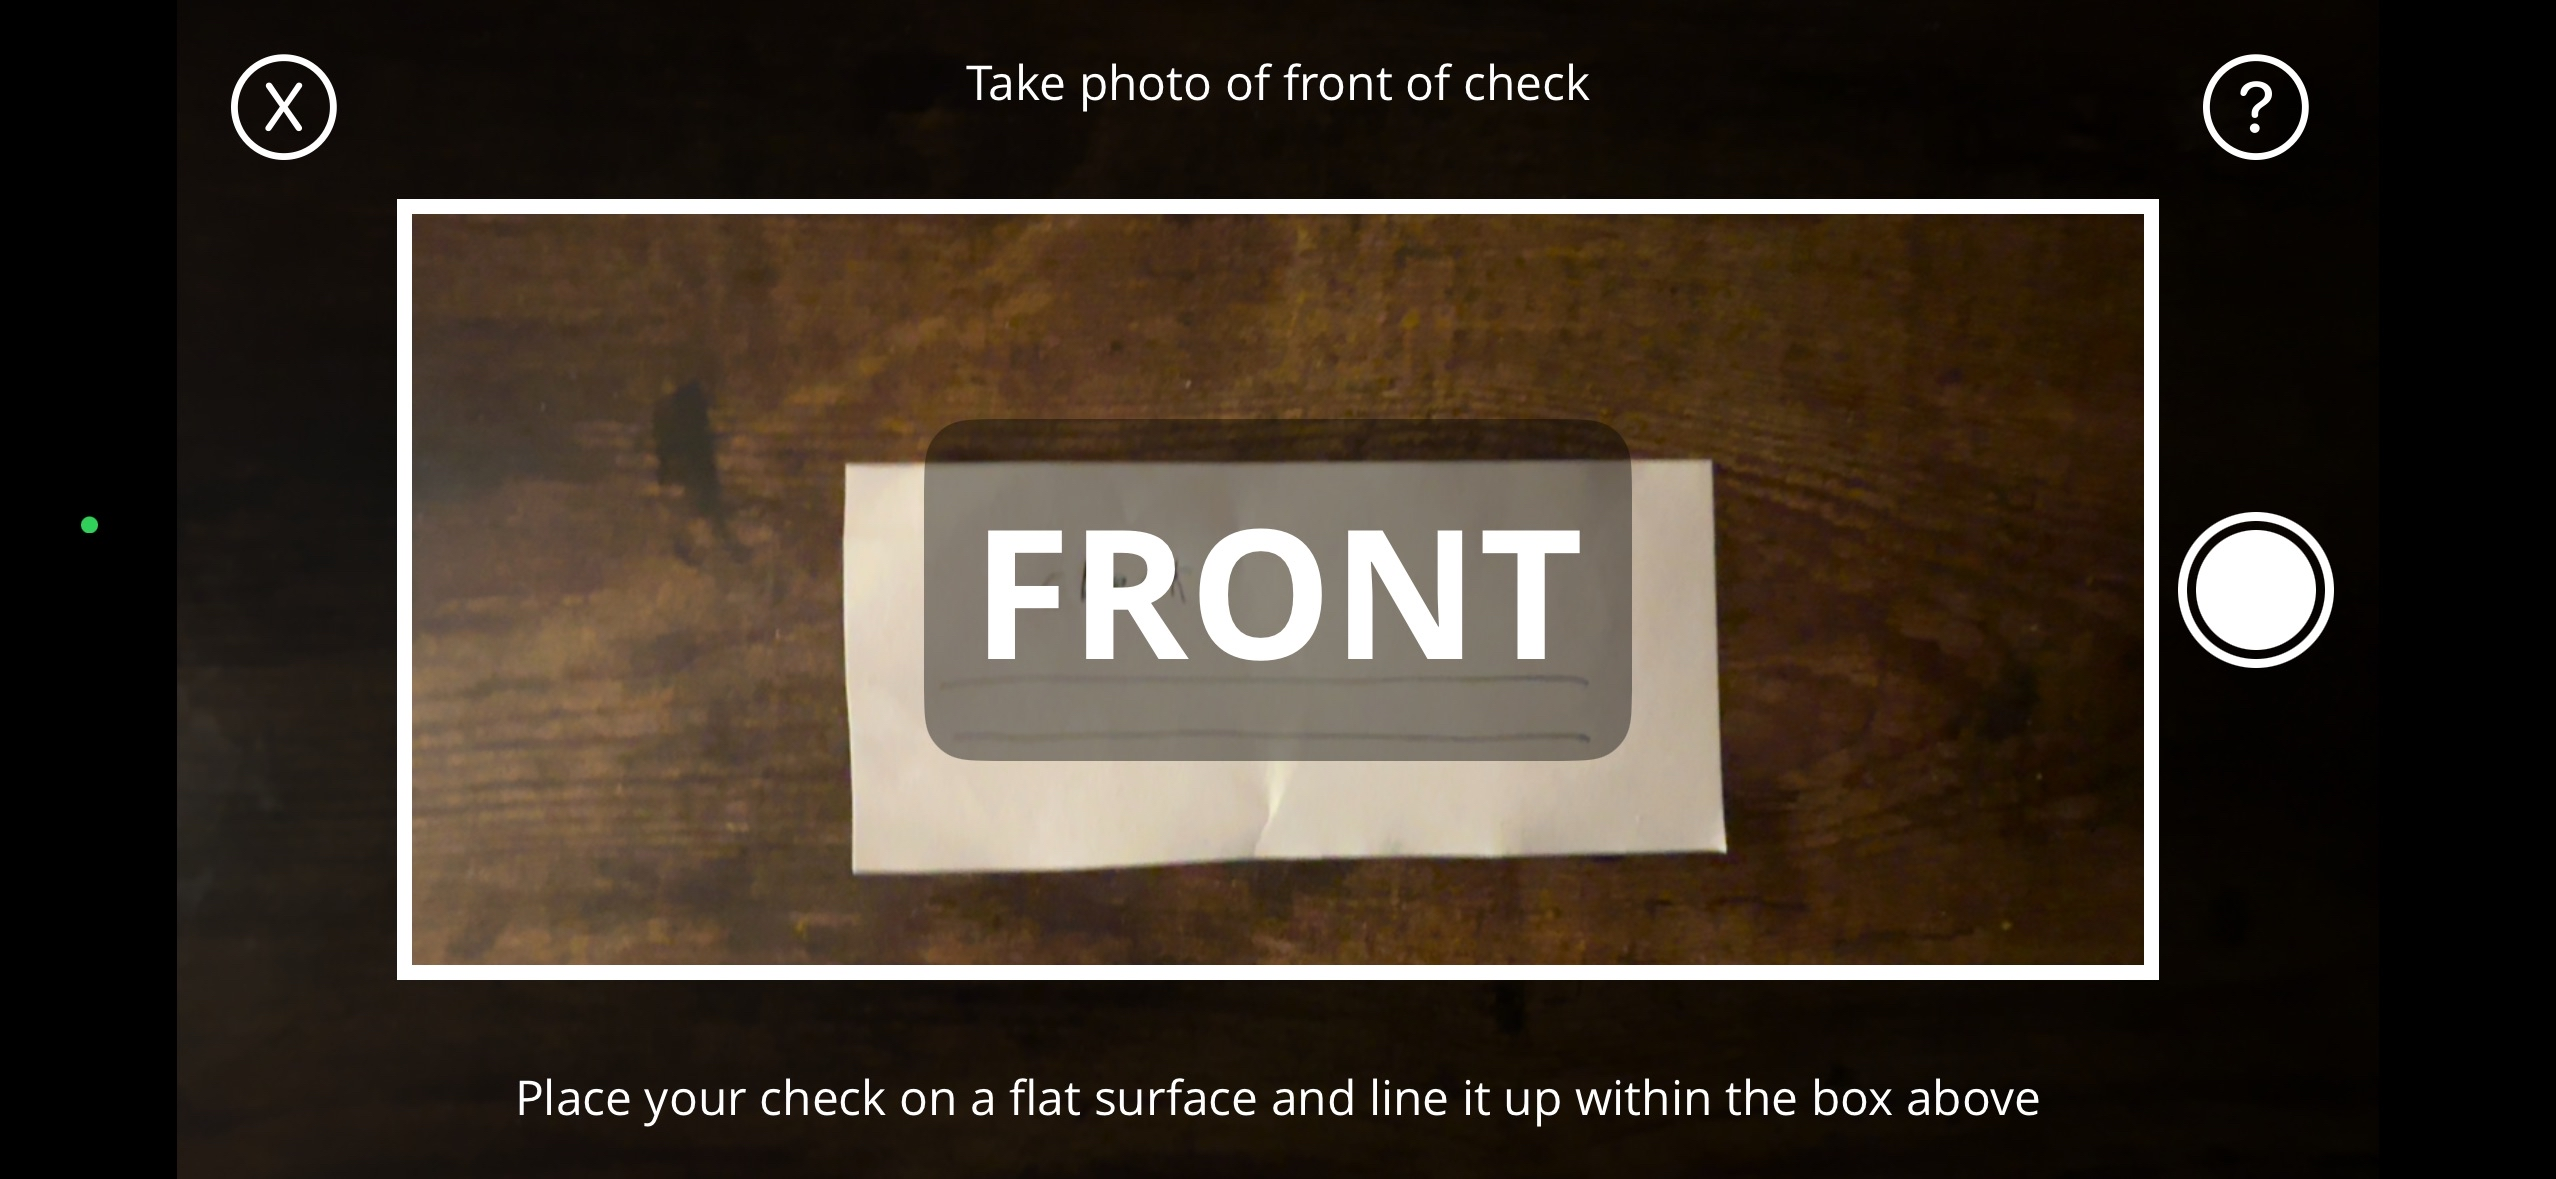
Step 4: Take a Photo of the Front of the Check
Now it’s time to photograph your check. Tap the camera icon under “Front of check” to open your phone’s camera.
Tips for a clear photo:
- Use a well-lit area — Natural light or a bright lamp works best. Avoid shadows falling across the check.
- Place the check on a dark, flat surface — A dark-colored table or desk helps the camera detect the edges of the check more easily.
- Line up the check inside the white box — You’ll see a white rectangle on the screen. Position the entire check within that box.
- Hold your phone steady — Keep your hands as still as possible to avoid a blurry image.
- Make sure all four corners are visible — The camera needs to see the entire check, including all edges.
When the check is lined up, tap the round capture button on the right side of the screen to take the photo.
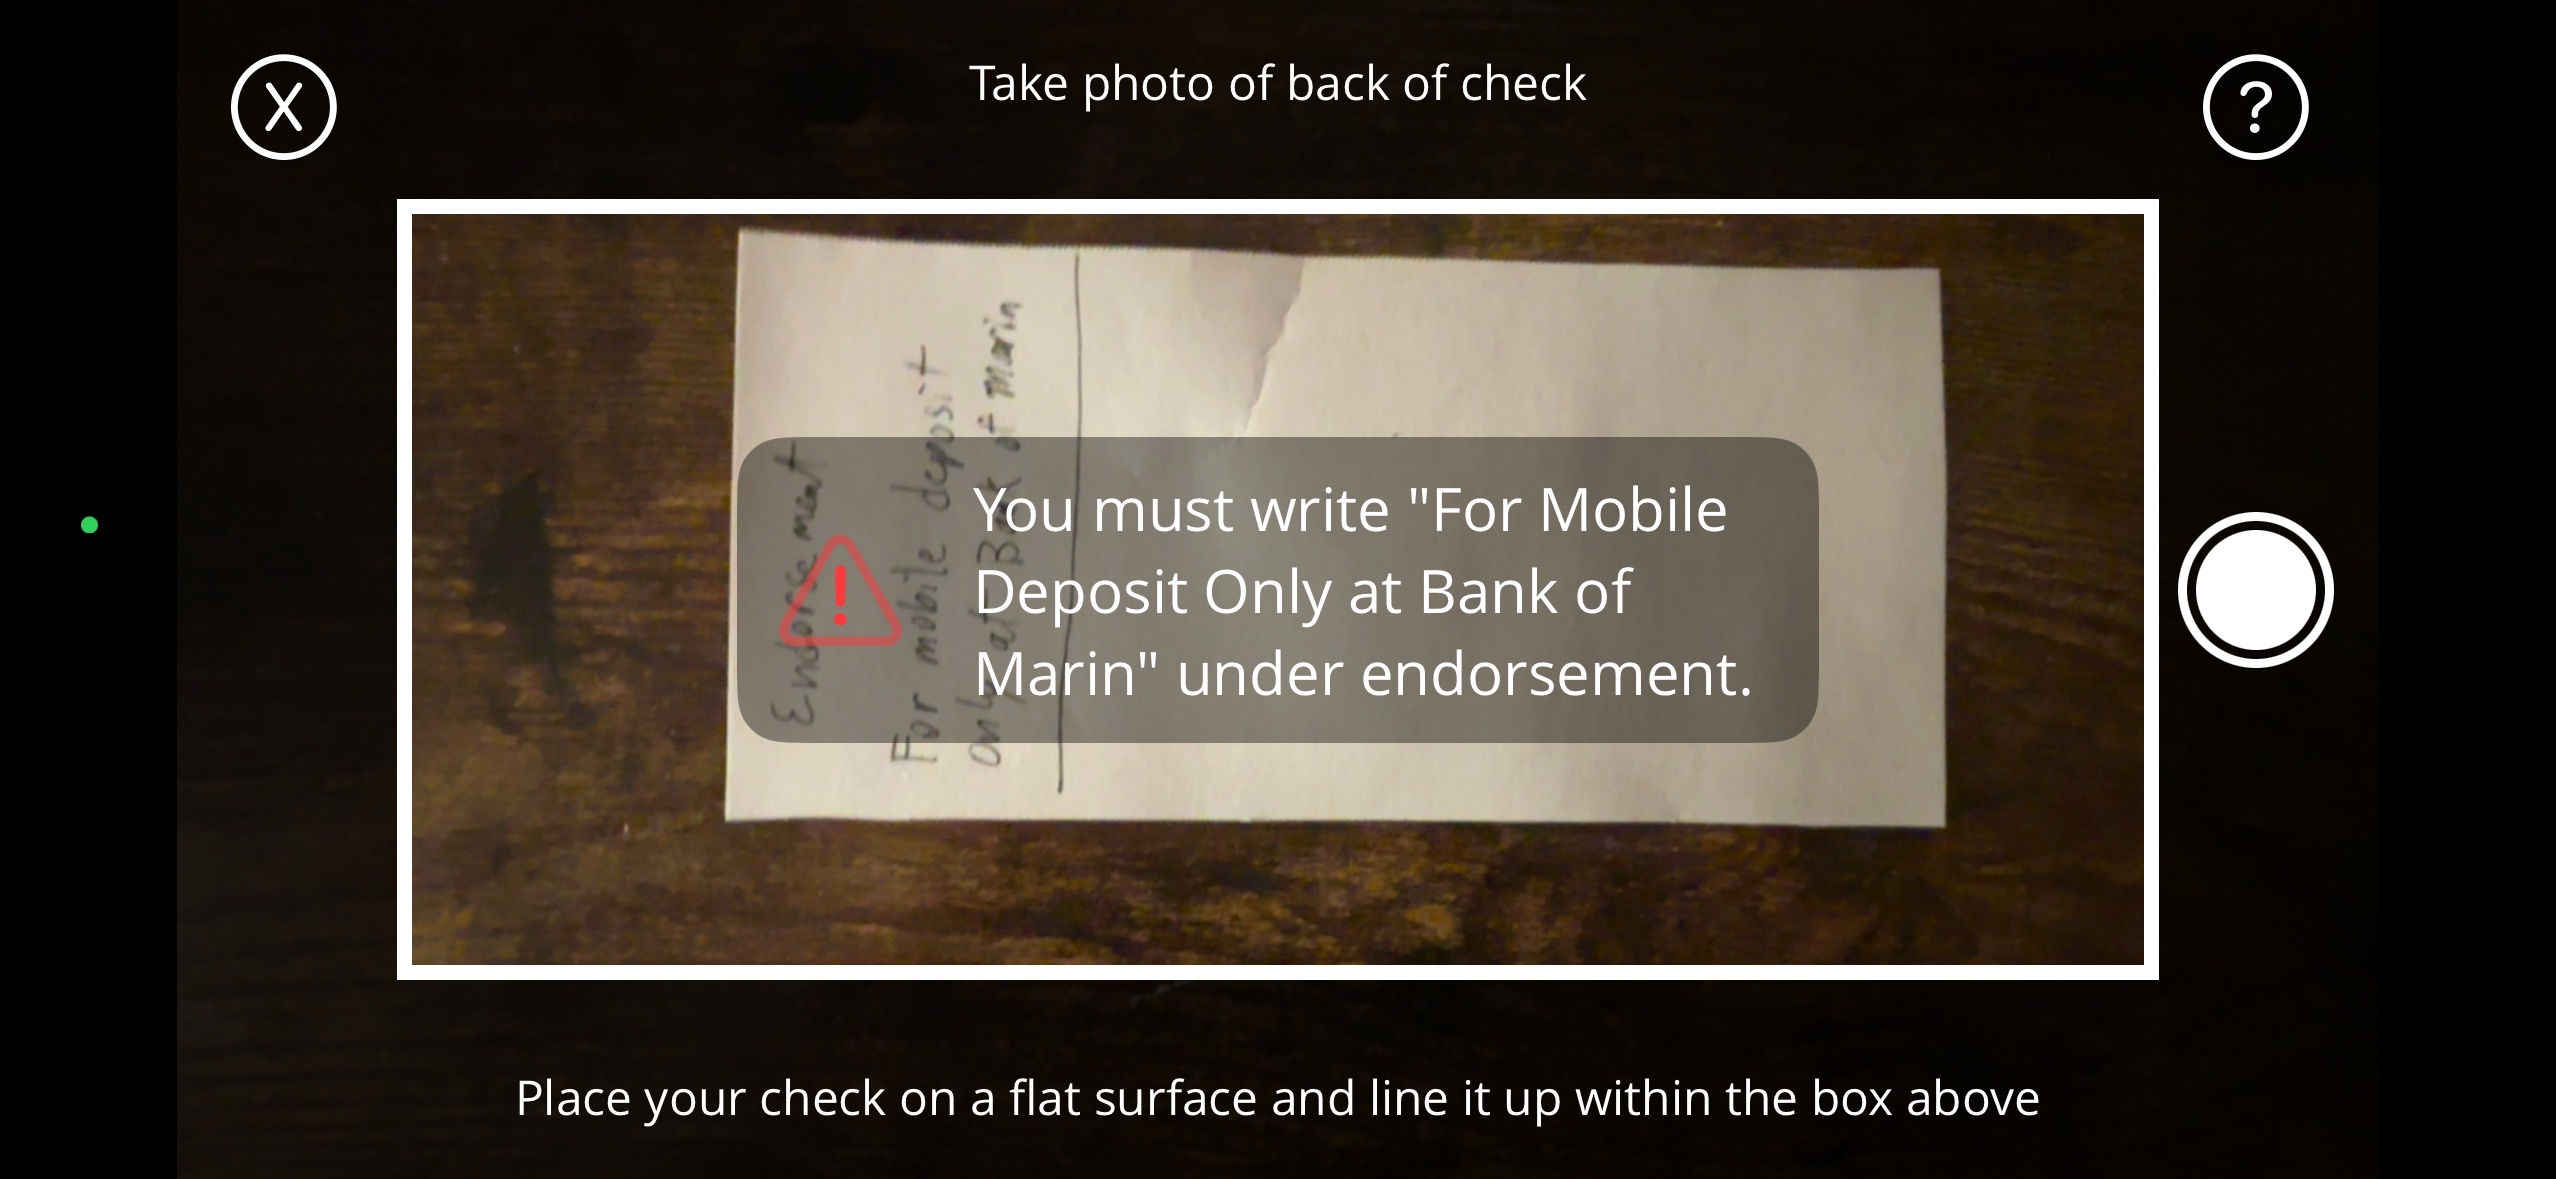
Step 5: Endorse and Photograph the Back of the Check
Before you photograph the back of the check, you must endorse it correctly. This is a very important step — if the endorsement is missing or incorrect, your deposit may be rejected.
How to endorse your check:
- Flip the check over so the back is facing up.
- Find the endorsement area (usually a few lines or a box at one end of the back).
- Sign your name on the top line.
- Write the following directly below your signature:
For Mobile Deposit Only at Bank of Marin
This endorsement text is required. Without it, the bank cannot process your mobile deposit. The app will remind you of this requirement when you open the camera for the back of the check.
Once you’ve endorsed the check, tap the camera icon under “Back of check” and photograph it using the same tips from Step 4 (good lighting, flat surface, check inside the white box).
Step 6: Review and Submit Your Deposit
After both photos have been captured, you’ll return to the Remote Deposit screen. Before you tap Submit Deposit, take a moment to review everything:
- Is the correct account selected?
- Does the amount match the check?
- Do both photos look clear and readable? (Tap on a photo to retake it if needed.)
When everything looks good, tap the green Submit Deposit button.
That’s it! You’ll receive a confirmation that your deposit has been submitted. The funds will typically be available within one to two business days, depending on the amount and your account type.
Troubleshooting: Common Issues
If you’re having trouble, here are solutions to the most common problems:
The app won’t accept my photo
- Make sure the entire check is within the white guidelines on the camera screen.
- Move to a brighter area — dim lighting is the most common cause of rejected photos.
- Place the check on a solid, dark surface (avoid patterned tablecloths or light-colored counters).
- Clean your phone’s camera lens with a soft cloth.
- Hold your phone directly above the check, not at an angle.
My deposit was rejected
- Verify that you wrote “For Mobile Deposit Only at Bank of Marin” below your signature on the back of the check.
- Confirm the dollar amount you entered matches the amount printed on the check.
- Make sure the check is made out to you and has not already been deposited.
I can’t find the Deposit Checks option
- You may need to enroll first. Follow the enrollment steps in Step 1 above from your computer or phone.
- Make sure you’re using the latest version of the Bank of Marin mobile app.
Quick Reference: Photo Tips at a Glance
- Lighting: Bright, even lighting with no shadows on the check
- Surface: Flat, dark-colored surface
- Position: Check fully inside the white box on screen
- Focus: Hold your phone steady until the photo is captured
- Endorsement: Sign the back and write “For Mobile Deposit Only at Bank of Marin”
Need Help?
If you have questions about Mobile Check Deposit or run into any issues, please contact us at (866) 626-6004. We’re happy to walk you through the process.
Related Articles
- Viewing Your Account InformationLearn how to access your balances, account details, and transaction history to confirm your deposit.
- Transferring FundsLearn how to transfer money between your Bank of Marin accounts and external accounts at other financial institutions.
- Mobile Banking SafetyProtect yourself when banking from your phone with tips on app security, public Wi-Fi, and more.